How to Blend Oil Pastels: 6 Step-by-Step Techniques
Short answer: oil pastels blend in two moves — lay down color with light, crossed strokes first, then push the pigment into the paper with pressure (burnishing) or activate it with a drop of oil medium (wet blending). This tutorial walks through 6 step-by-step techniques — dry layering, wet blending, burnishing, fingertip blending, heat blending, and value-gradient building — plus a 5-step leaf case study, the 5 most common mistakes and their fixes, and a 4-week practice plan you can run in 15–25 minutes a day.
Why blending is the make-or-break skill in oil pastels
Oil pastels are pigment bound with a non-drying oil-and-wax binder. That makes them soft and creamy, and it means a mark you lay down stays workable for years — you can always blend it. That sounds like a free pass, but it hides the real constraint: the paper. Pigment only grips while the paper's tooth (its microscopic surface texture) is still alive. Every layer you add fills that tooth, and once the surface becomes waxy and sealed, new color slides off instead of biting in.
So the goal of every technique below is the same: deposit pigment evenly while keeping as much paper tooth as possible. Order and restraint matter more than speed. Work light to dark, use the smallest amount of medium that works, and seal (burnish) only when the drawing is finished.
Still deciding between soft pastels and oil pastels before you start? Our comparison of the two mediums — texture, blending, surface compatibility and lightfastness — is in the soft pastels vs oil pastels guide.
What you need: the minimal setup
| Item | What to use | Why it matters |
|---|---|---|
| Oil pastel sticks | Start with 6–8: 2 warm (yellow, red-orange), 2 cool (blue, green), plus black, white and one neutral buff | A wedge chart + one project need far fewer sticks than people expect |
| Paper with tooth | Sanded or cold-press, 140–300 gsm; heavier paper survives burnishing | Smooth bristol blends easiest but gives up adhesion after two or three layers |
| Blending stump + tissue | One each, plus a clean cloth | Stump for firm areas, tissue for big soft areas |
| Oil medium | Odorless mineral spirits or baby oil, and a soft brush | Wet blending is impossible without it — but you need a drop, not a flood |
| Fixative (optional) | Matte, 2 light coats | Oil pastels never harden fully; fixative protects finished work from smudging |
If you are building a set from scratch, a 48-color ultra-soft square oil pastel set covers a full wedge chart plus several projects without buying single sticks, and for classrooms or kids a washable 24-color range keeps the clean-up sane. For the rest of this tutorial, one modest set is enough.
Technique 1 — Dry layering (the foundation)
Every smooth oil pastel drawing is built from crossed, light strokes. This is the colored-pencil habit that carries over directly:
Step 1. Cover the area with your lightest color in long, even strokes at light pressure. The paper should still show through — that gap is your value control.
Step 2. Add your midtone at 30–45° across the first strokes. The crossed deposits trap light differently and the two colors begin to optically mix.
Step 3. Continue light to dark. Never the reverse — light pigment over dark reads as gray and cannot be fixed without scraping.
Step 4. Check from two meters away. The area should read as one color, not as strokes. If you can see lines at that distance, the pressure was uneven or the colors were too far apart on the wheel.
Use dry layering for skies, backgrounds and any large area where you want texture to survive.
Technique 2 — Wet blending (seamless gradients)
When dry strokes are not smooth enough — skies, skin, soft shadow — add a trace of oil medium and let it do the mixing for you:
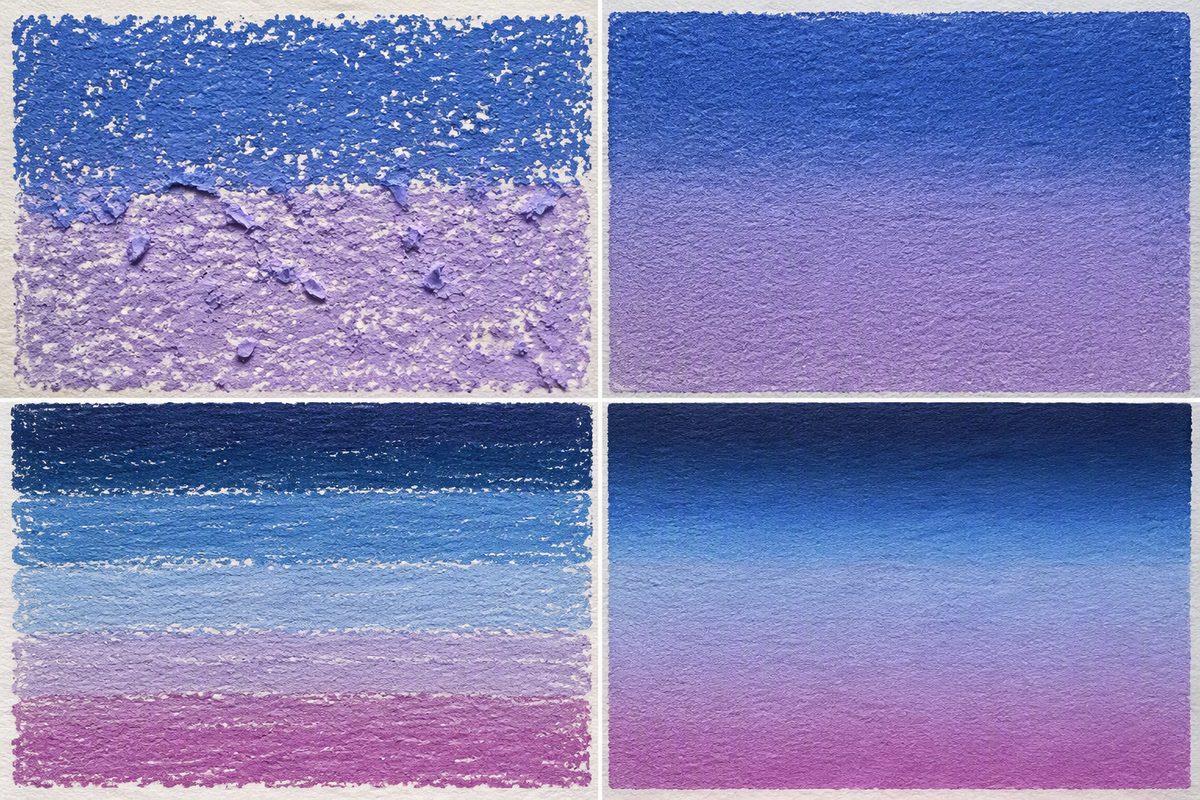
Step 1. Dry-layer the two adjacent colors side by side with a hard boundary between them. Do not mix them first.
Step 2. Load a soft brush (or a fingertip) with a tiny amount of odorless mineral spirits or baby oil. One drop per 10 strokes — less than feels necessary.
Step 3. Stroke back and forth along the color boundary. The oil re-melts the wax in both layers and the pigments merge into a continuous gradient.
Step 4. Swap to a clean, dry brush between colors so you do not smear one hue into the other uncontrollably.
Step 5. Let the area rest 10–30 minutes before adding detail. The medium keeps the layer tacky; working into it too soon drags the underlying color up with your brush.
Failure mode: too much medium leaves a sticky, smudge-prone patch that can yellow. If a zone turns gummy, wipe it with a clean cloth while it is still wet and re-layer dry — do not keep adding oil.
Technique 3 — Burnishing (sealing the surface, last step only)
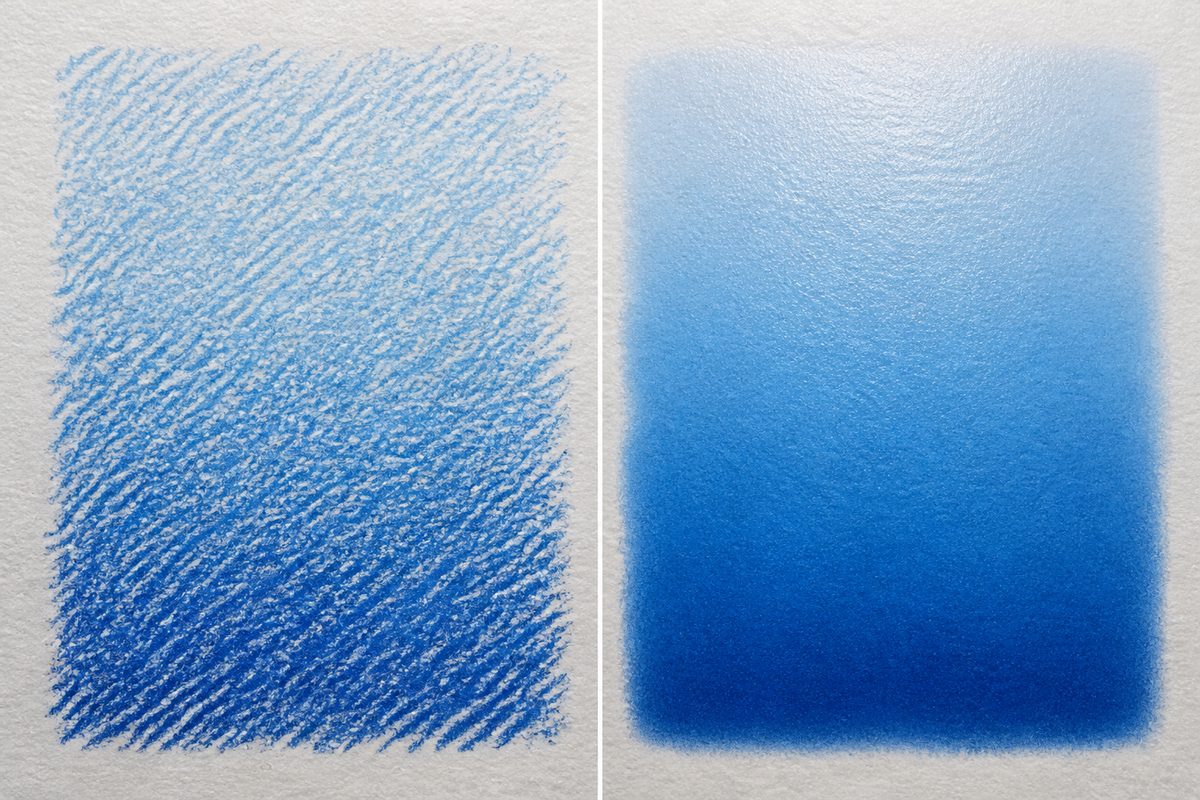
Burnishing means pressing pigment firmly into the paper's tooth until the surface turns smooth and slightly glossy. It locks the drawing in place — so it is the final technique, not a step you reach for mid-drawing:
Step 1. Confirm the composition is complete. Burnished paper stops accepting new color, so plan your darkest accents first.
Step 2. Take a stick of a color already in the area, or a light neutral (white or buff).
Step 3. Press the side of the stick (or a blending stump) into the surface with firm, even pressure, one direction only, 20–30 seconds per pass.
Step 4. Stop after one or two passes. A third pass seals the sheet for good and any later addition will sit on top like wax on wax.
Technique 4 — Fingertip and tissue blending (fast soft edges)
Oil pastels are unusually finger-friendly because skin oil is itself a mild blending medium:
Step 1. For small areas (skin, clouds, petals), rub in slow circles with a fingertip. Refresh the finger or use a clean tissue patch every 30 seconds — a tired finger just smears what is already there.
Step 2. For large soft transitions, lay a tissue over the zone and rub lightly, then lift. The tissue takes pigment off (softening) and leaves it in a new spot (spreading) at the same time.
Step 3. Keep two tissues: one clean, one deliberately stained with your local color. The stained one lets you feather a shadow edge into bare paper with the exact hue already in place — the fastest soft-edge trick in the medium.
Technique 5 — Heat blending (the melting method)
Oil pastels soften around 60–70°C, so heat turns them into a paint-like layer you can brush out:
Step 1. Hold a hair dryer on low (or a heat gun on its coolest setting) 10–15 cm from the paper, moving it constantly.
Step 2. As the surface warms and softens, blend with a clean brush in one pass while it is molten — you have a short window before it re-hardens.
Step 3. Stop before you see bubbling or gloss pooling; both are signs of overheating, and they can warp the paper. Work on a heat-safe surface.
Use heat for bold, painterly zones where you want a glass-smooth finish without a single visible stroke.
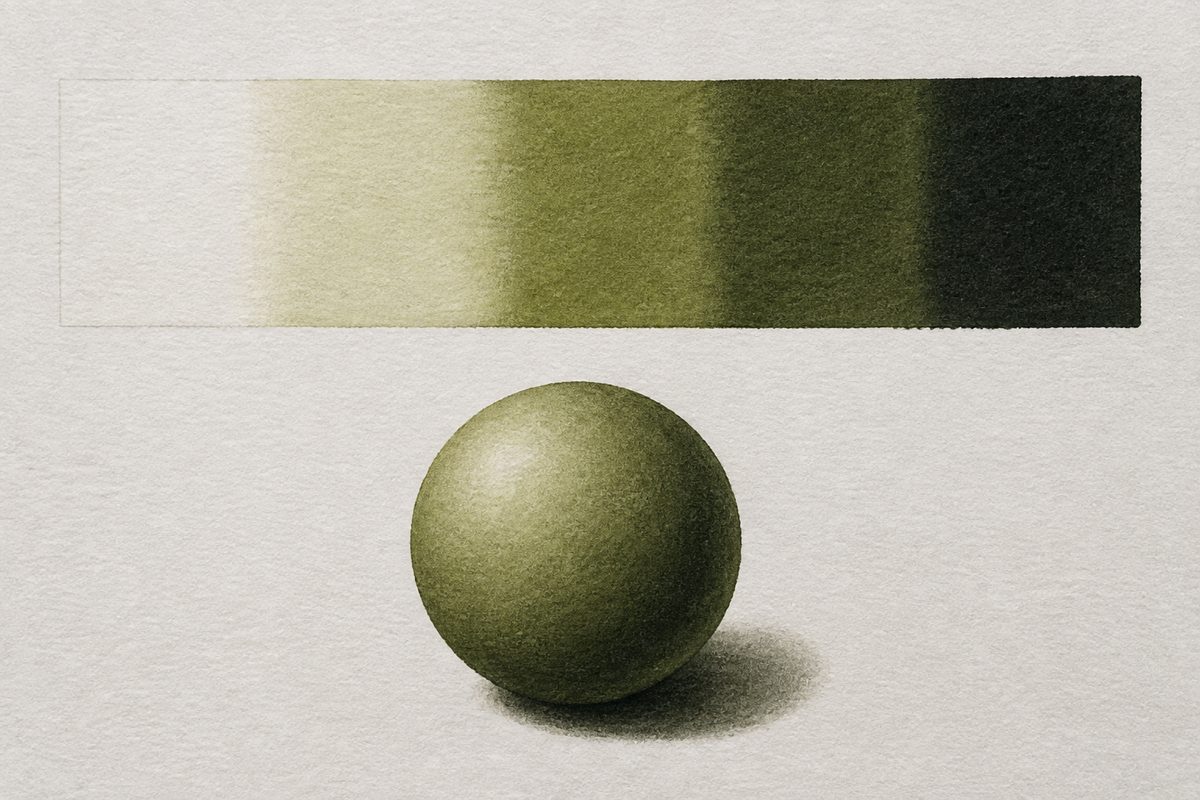
Technique 6 — Building a smooth value gradient (the practice standard)
One exercise tests everything above at once — value control, even coverage, and blending:
Step 1. Draw a 10 × 3 cm bar and divide it into 5 boxes.
Step 2. Box 1 stays bare paper (value 1). Boxes 2–5 step from light (white + color) to full color (value 4) to color + black (value 5).
Step 3. Dry-layer each box with crossed strokes.
Step 4. Wet-blend only the boundary zones — 2–3 mm at each step — so the paper shows where the steps land.
Step 5. Step back one meter. The jumps between boxes should look equal, and no boundary should read as a hard edge.
If a boundary shows a bright stripe, the two adjacent values were too far apart — insert a mix. If a box looks streaky, redo it with more even pressure before touching the boundaries.
Real case study: a leaf study in 5 steps
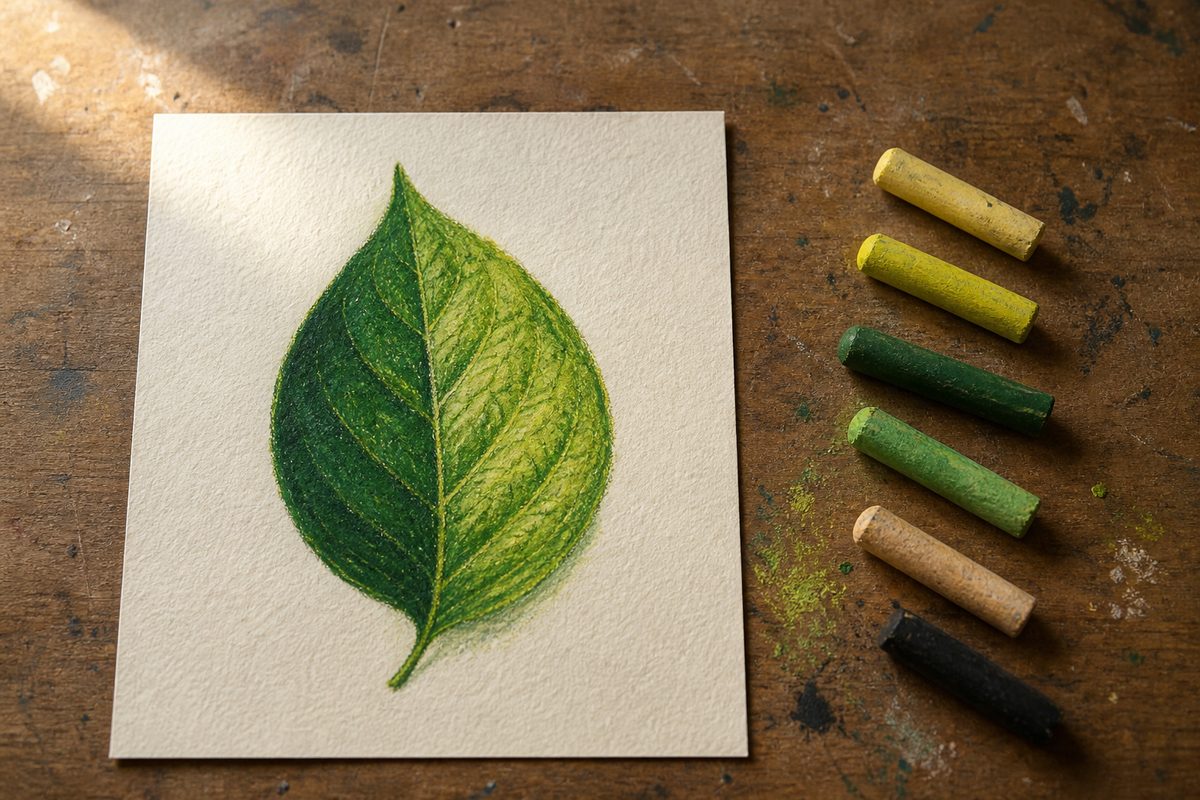
A single leaf is the shortest path to using all six techniques in one drawing (about 20 minutes):
Step 1 — Underdrawing. Light 1B graphite line: leaf outline plus midrib and three side veins. Keep the hand loose; heavy dark graphite can repel waxy pigment, so a light line is enough (a grease pencil works too). For what each grade actually lays down, see pencil grades explained.
Step 2 — Base coat. Yellow-green with a touch of yellow, dry-layered at light pressure over the whole leaf (Technique 1).
Step 3 — Shadow side. Mix green with a blue and a touch of black, then crisscross it over the base on the lower-right half at 45°.
Step 4 — Veins and softening. Darken each vein with the deepest green-black, then feather the shadow edge with a stained tissue (Technique 4).
Step 5 — Seal. One burnishing pass with neutral buff over the shadow side only (Technique 3), then a matte fixative if the piece will be handled or shipped.
5 common mistakes — and the exact fix
| Mistake | Why it happens | Fix |
|---|---|---|
| Waxy buildup — surface turns chalky and repels new color | Too many layers; the paper tooth is filled and sealed | Stop layering; burnish lightly to finish the zone, or move to fresh paper for the next section. Plan dark-to-sealed, not the reverse. |
| Streaky, banded gradients | Uneven dry strokes and too little blending at the boundary | Cross strokes at 30–45° with even pressure, then wet-blend a 2–3 mm zone at each boundary (Technique 2, Step 4). |
| Muddy, gray colors | Mixing three or more colors directly on the paper | Max two colors per mix; trial the mix on a palette scrap first; keep one clean stick reserved for corrections. |
| Finished work smudges | Oil pastels never harden fully | Two light coats of matte fixative from 15 cm+; store or display under glass. |
| Bare "holes" in darks | Light pressure on value 4–5 areas, often using the tip instead of the side of the stick | Dark values are pressed in with the side of the stick; check from two meters and re-deposit before burnishing. |
A 4-week practice plan (15–25 min/day)
Blending is a motor skill — short daily reps beat long weekend sessions.
Week 1 — Value bars. Five-value gradient bars, 10 minutes a day, different color pairs each day (warm, cool, complementary). Goal: equal jumps, no hard edges.
Week 2 — Color wedges. Two primaries per day: mix the six in-between steps on a palette scrap, then transfer to paper. Goal: no muddy midtones — if a step turns gray, you mixed too many colors.
Week 3 — Single-object studies. An apple, an egg, a leaf — alternate dry layering with one wet-blended zone per study. Goal: one clean value transition per object.
Week 4 — A finished piece. One small drawing, 5–7 colors, burnished and fixed. This is the piece you keep — it shows the full range of techniques working together.
For paper that survives four weeks of burnishing practice without crumbling, sanded or cold-press stock in the 180–300 gsm range is the working standard; our canvas and art paper guide covers how the grades actually differ: canvas & art paper, types and grades.
FAQ
How do I blend oil pastels without getting a gummy surface? Use the minimum amount of medium — one drop per zone — and let each wet-blended area dry 10–30 minutes before the next step. For small areas, finger blending alone often works, because skin oil is a mild natural medium.
Can I draw under oil pastels with a pencil? Lightly, yes. Keep the graphite line light (HB to 1B, loose hand); heavy dark graphite can repel waxy pigment. For cleanest work, underdraw with a grease pencil or a light colored pencil instead.
Do oil pastels need fixative? Finished pieces do, practically speaking: the medium never hardens fully, so two light matte coats protect against smudging. Some artists rely on a final burnishing layer to seal the surface instead — it locks the drawing without changing the color.
What paper is best for blending oil pastels? Paper with real tooth: sanded or cold-press, ideally 180–300 gsm if you plan to burnish. Smooth bristol gives the easiest blending but gives up pigment adhesion after a few layers, so it is better for quick studies than finished work.
Why does my oil pastel drawing look chalky and refuse new color? That is waxy buildup — the paper's tooth is filled. Stop adding layers, burnish the zone to seal it, and continue on fresh paper. It is an ordering problem, not a materials problem: seal last, always.
Building oil pastel kits for a school, studio or retail brand? Send us an inquiry — we will come back with a matching technique-set spec and sample plan.