Two-Point Perspective Drawing: A Step-by-Step Tutorial for Beginners
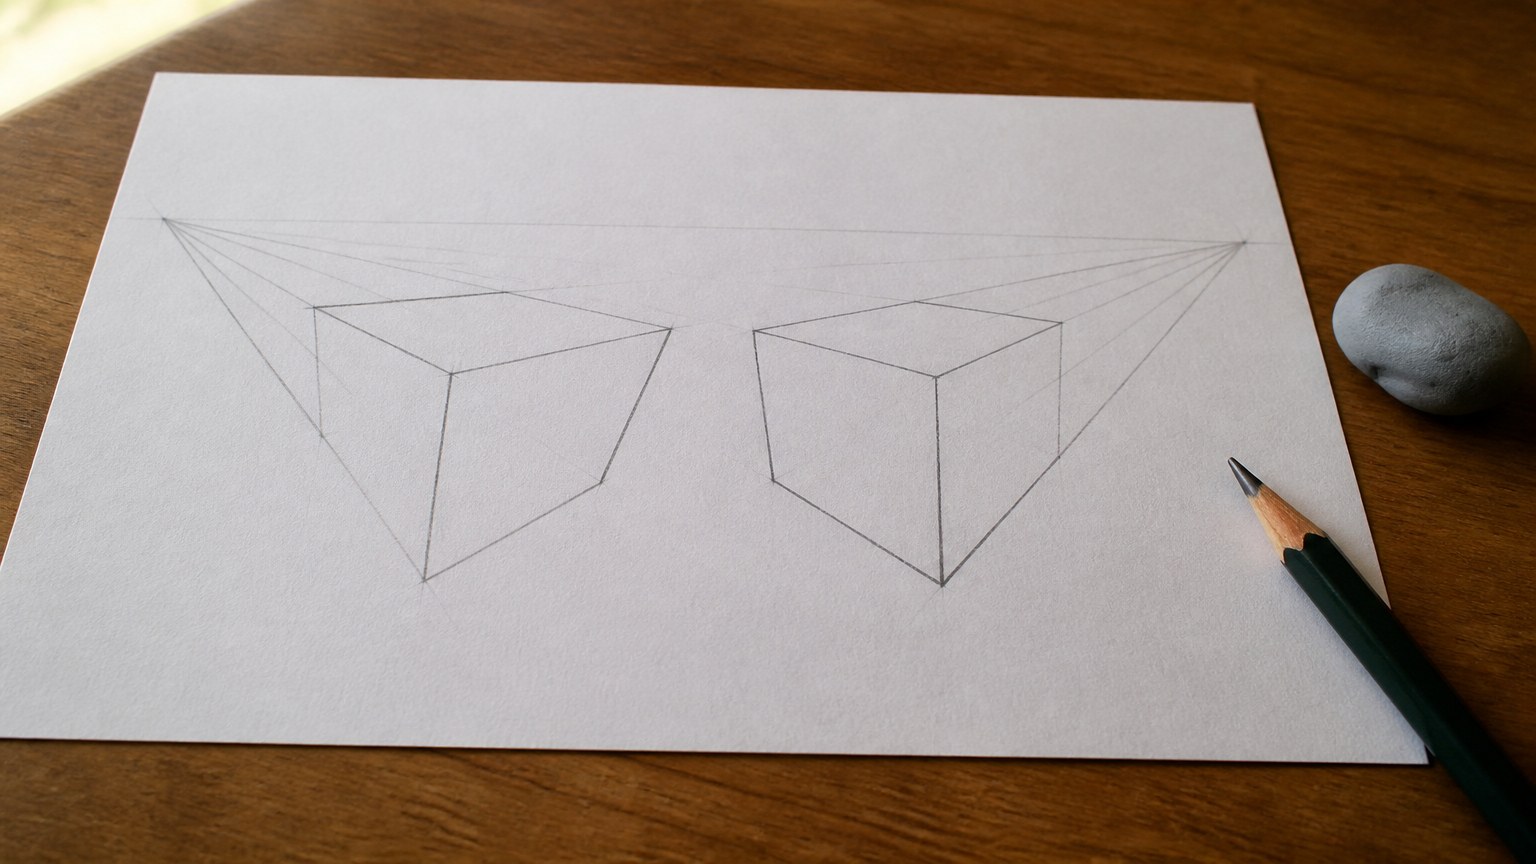
Short answer: two-point perspective uses one horizon line and two vanishing points, with every vertical edge staying vertical on the page. Mark your eye level, place both vanishing points as far apart as the paper allows, draw the nearest vertical corner first, then run two sets of receding lines to those points and let the box build itself between them. Practise on a single box for twenty minutes before you attempt a building. This tutorial walks through the setup, the corner, storey heights, windows, a finished street-corner study you can complete in about forty minutes, the six mistakes that make drawings look warped, and a four-week practice plan.
What two-point perspective actually is
Perspective is not a style. It is a drawing convention that imitates how straight edges behave in real space: as parallel lines travel away from you, they appear to converge. Where they converge is a single point, and every set of parallel edges has its own.
If you look straight at the flat face of a building, only one set of edges recedes and you get one-point perspective. The moment you turn your head slightly, or stand at a corner, a second set of edges starts receding too. That is two-point perspective, and it is the everyday view of any street corner, table edge, box or piece of furniture.
Three rules hold the entire system together:
- Verticals stay vertical. In two-point perspective, upright edges are drawn as true vertical lines, parallel to the sides of your paper. If your verticals lean, the drawing will read as a photo taken with a tilted camera.
- Receding lines converge on the horizon line. Every edge that goes back in space aims at one of two vanishing points, and both points sit on the same horizontal line.
- The horizon line is your eye level, not the ground. If the horizon crosses a building halfway up, you are looking at it from that height. Change the horizon and you change your whole viewpoint.
Everything else in this tutorial is bookkeeping: which lines go to which point, and how to keep them consistent.
Step 0: the kit that is actually enough
Perspective drawings fail on soft pencils and thin paper, not on expensive equipment. You need three things: a pencil that draws a faint line you can erase, a straight edge, and a sheet that can take repeated erasing without pilling.
| Item | What to use | Why it matters for perspective |
|---|---|---|
| Pencil for construction | An HB, sharpened to a long point and used with light pressure. | Construction lines have to be visible and disposable. An HB lifts cleanly with a kneaded eraser; a 2B leaves a ghost line that shows through later shading. |
| Pencil for finishing | A 2B for dark accents where walls meet the ground. | Perspective drawings need contrast at the base of objects, or the building floats. One darker grade is enough. |
| Straight edge | A 30 cm steel ruler, or a plastic one with a bevelled edge. | Any wobble in a long receding line is amplified at the vanishing point, so the line must be dead straight. A bevelled edge keeps ink and graphite off the paper. |
| Paper | Drawing paper around 120–180 gsm with light tooth. | Construction lines get erased two or three times in the same area. Thin copier paper tears or burnishes and then refuses new graphite. |
| Eraser | One kneaded eraser, pulled to a point. | A kneaded eraser lifts the faint line without scuffing the surface. A hard eraser takes the tooth with it. |
Two optional additions earn their place: a sheet of tracing paper to rest your hand on, and a second pencil kept sharp while the first dulls. If you are unsure which grade to draft with, our guide to pencil grades explains the H-to-B scale and what each grade does under pressure.
Step 1: set the horizon line and both vanishing points
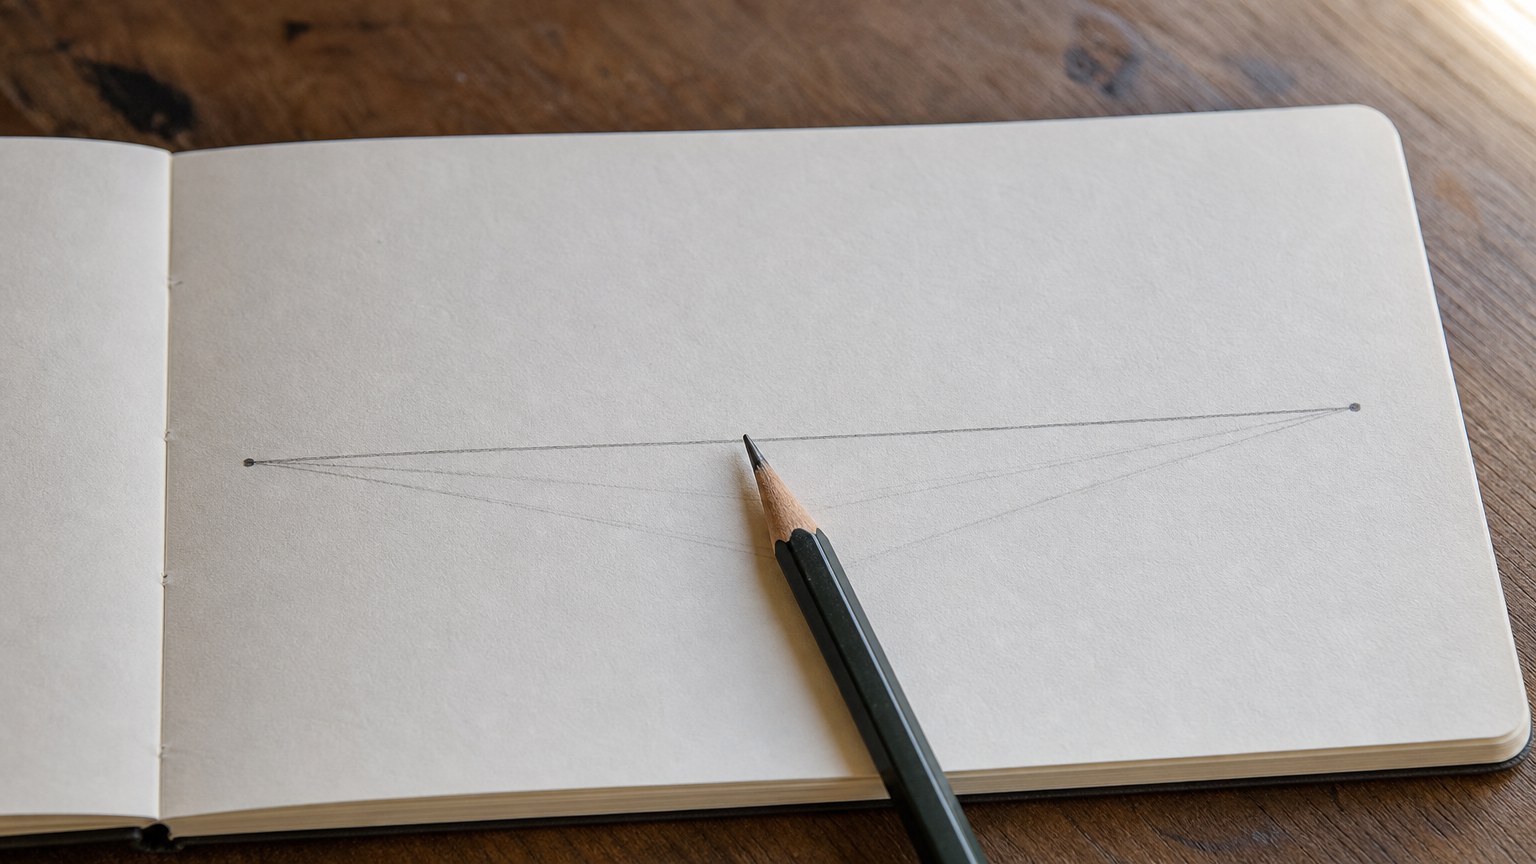
Draw one horizontal line across the sheet with the ruler, and decide where it sits vertically. Low on the page means you are standing at street level and looking up; high on the page means you are above the scene, looking down on rooftops. There is no correct height, but commit to one before drawing anything else, because every proportion depends on it.
Now mark two points on that line, one near each edge of the paper. This distance is the single most important decision in the drawing:
- Wide apart (both points near the edges) gives a natural, calm view, close to how the scene looks from a few metres back. Use this for buildings and interiors.
- Close together gives a dramatic, wide-angle look with steeply slanting walls. It is harder to control and exaggerates the distortion at the corners.
Mark both points lightly with a small cross, and label them in your head as left and right. Every receding line you draw from now on goes to exactly one of them, never to a third, invented point. If a line needs to go somewhere else, the drawing has drifted and needs to be rebuilt rather than patched.
Step 2: draw the nearest corner first
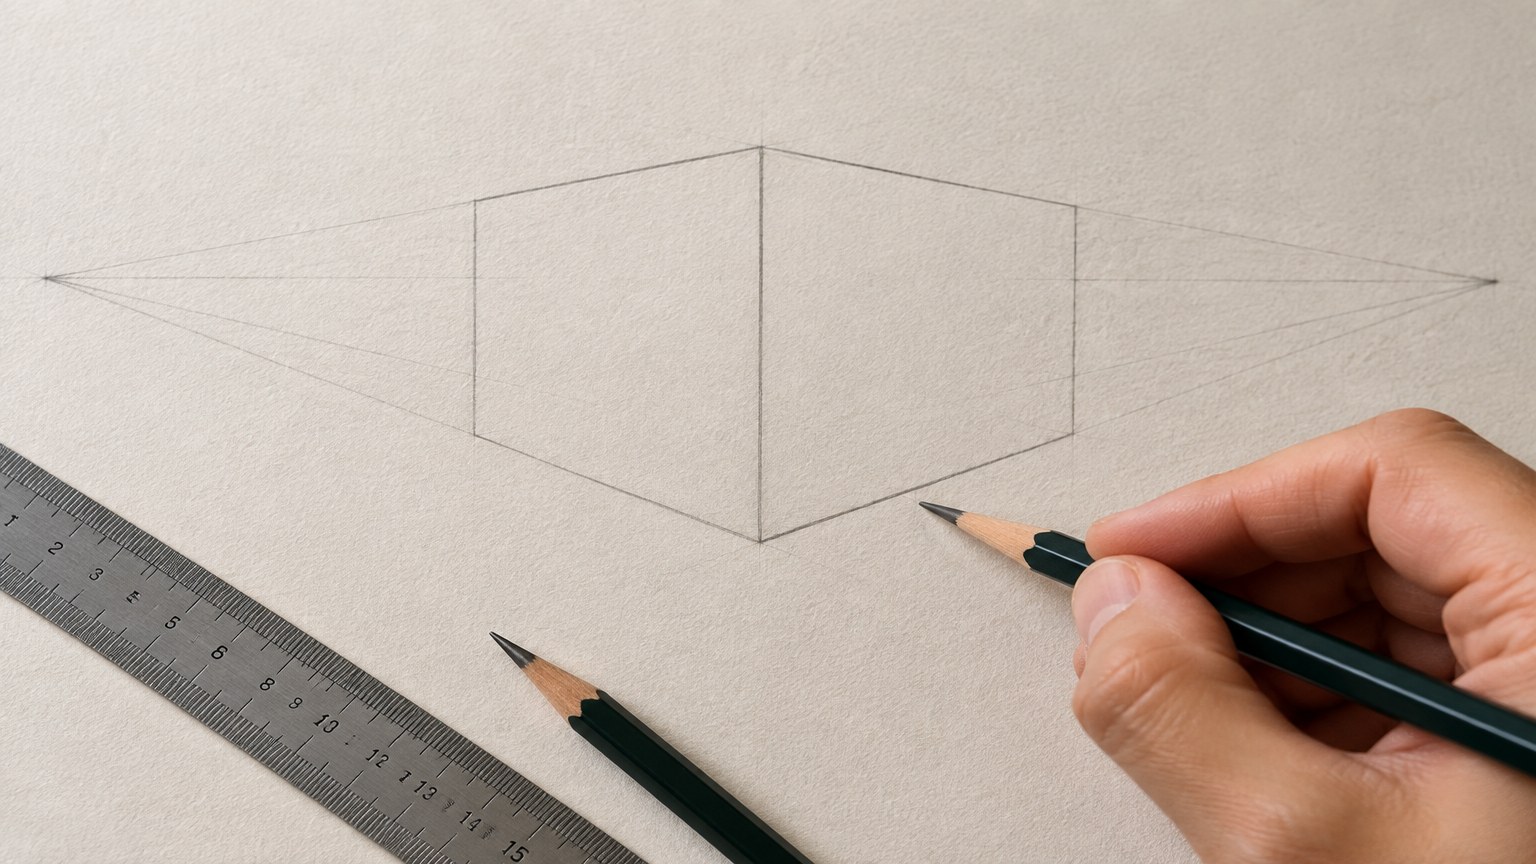
Start with the edge closest to the viewer, drawn as a true vertical line. This is the one measurement you take from life rather than from the perspective system: decide with the pencil held at arm's length how tall that corner is compared with the width of the whole box, then transfer the ratio to the paper.
From the top of that vertical, draw two light lines, one to the left vanishing point and one to the right. Repeat from the bottom. You now have a wedge shape, four lines meeting at the near corner, and the box will live inside it.
Place the back corner: choose a point on each pair of lines and drop a vertical between them. The shorter that vertical, the deeper the box. A common beginner error here is making the first box too deep, which makes it look stretched like a corridor instead of solid like a crate.
Finally, close the top and bottom faces by running lines from the back corner to the opposite vanishing points. Everything is still faint at this stage. Nothing is committed until all four sides agree with each other, and agreement is easy to check: hold the sheet at arm's length and look for any edge that changes direction before it reaches its own vanishing point.
Step 3: keep verticals vertical and check the corners
Stand back from the drawing every few minutes. The two things that break a perspective drawing are almost always visible from a distance and almost invisible up close:
- Leaning verticals. A vertical drawn by hand drifts. Use the ruler's edge against the paper's edge to verify a vertical rather than trusting your eye, and re-draw any that leans.
- Impossible corners. Every visible corner must be the meeting point of three edges: one vertical and two receding lines to different vanishing points. If two receding lines at a corner head to the same point, that corner cannot exist in this view.
Erase the construction lines as you confirm them, but keep both vanishing points marked on the sheet. They are reference points, not mess, and removing them halfway through guarantees that the second half of the drawing will drift.
Step 4: measure storey heights before you draw windows
A building is a stack of boxes, and the fastest way to keep the floors honest is to divide one near vertical edge rather than estimating each floor separately.
- Take the total height of the near corner and divide it into equal parts for the number of storeys, using a ruler or by stepping the pencil along the edge.
- From each division point, run a light line to the vanishing point that governs that face. These lines are the floor and ceiling lines of every storey on that side.
- Repeat for the second face using its own vanishing point. The two sets of lines will differ in spacing, and that difference is exactly what makes the corner read as a corner.
Notice that floors on the receding face get closer together the further back they go. They must: they are converging with the vanishing point. If the spacing stays even, the drawing will look like a diagram of a building rather than a building.
Step 5: place windows with diagonals instead of guessing
Dividing a receding wall into evenly spaced windows is the problem that makes beginners give up. There is a reliable construction for it.
- Draw the first window near the front of the wall, and mark the gap to the second window.
- Draw a diagonal from the top of the first window to the bottom of the second, then extend it until it meets the base line of the wall.
- From that meeting point, drop a vertical to find where the next window starts, then repeat the diagonal from the second window.
The gaps will shrink automatically as the wall recedes, with no measurement and no arithmetic. The same trick spaces fence posts, lamp posts, columns and floorboards. It also works vertically for rows of windows on upper floors, using a diagonal from the top floor down.
A street-corner study you can finish in about forty minutes
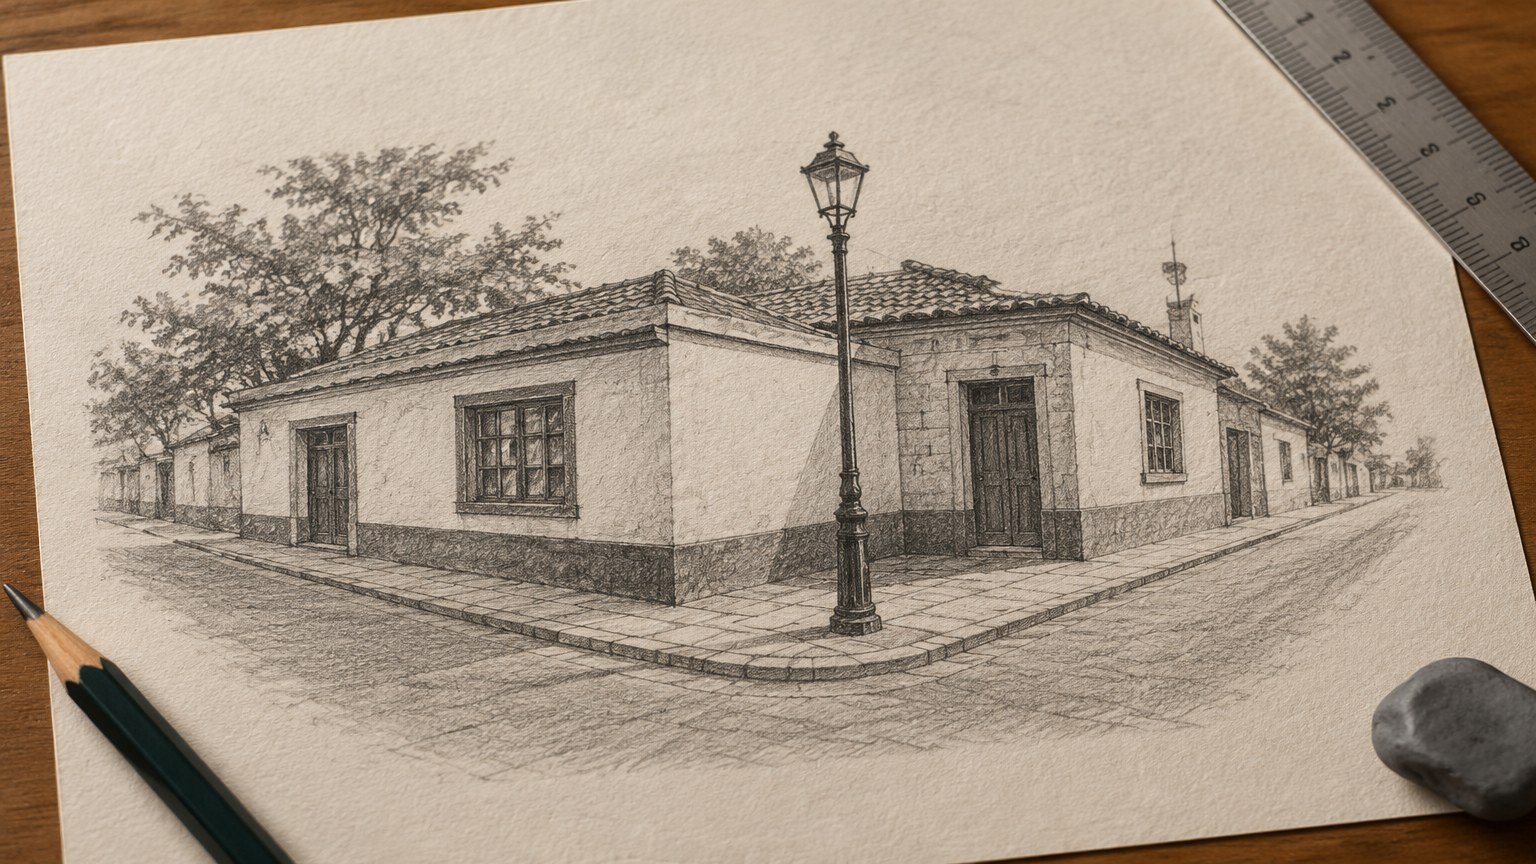
Setup (5 minutes)
Choose a corner you can see from one fixed position, ideally a low building opposite a taller one so the two faces differ in height. Sit still. A viewpoint that shifts halfway through a perspective drawing cannot be corrected afterwards.
Construction (15 minutes)
Set the horizon at the height of your own eye, then place both vanishing points near the edges of the sheet. Draw the near corner of the taller building, run its four receding lines, then build the shorter building from the same two points. Lay in the pavement edge as a line receding to one point so the buildings have something to stand on.
Division (10 minutes)
Divide the near vertical into storeys, carry the divisions across both faces, then place windows using the diagonal method. Add the door and the lamp post in the same way, and check every one of them against its vanishing point before darkening anything.
Finish (10 minutes)
Erase the construction lines, then restate the edges you want to keep with the 2B: the corner itself, the pavement edge, and the contact shadow where the walls meet the ground. Add tone on the shadow side of each building with the side of the lead, and leave the sky as bare paper. A perspective drawing does not need much shading; it needs clean construction and one dark anchor per building.
Six mistakes that make perspective drawings look warped
| What you see | What is actually happening | The fix |
|---|---|---|
| The box looks like it is falling over | Verticals were drawn by hand and drifted a degree or two | Re-draw every vertical against the ruler, and check the sheet's own edge as a reference |
| Walls bulge outward in the middle | Receding lines were drawn in two segments and do not meet at the vanishing point | Draw each receding line in one pass with the ruler, from edge to edge, then erase the overshoot |
| The building looks stretched like a corridor | The first box was made too deep, so the back corner sits too far inside the wedge | Move the back vertical closer to the front corner; keep depth less than half the visible width at first |
| Windows get bigger as they go back | Each window was drawn separately instead of derived from a division | Use the diagonal method from Step 5 and let the spacing shrink automatically |
| Floors look level but the building looks flat | The second face was divided using the same spacing as the first | Divide each face with its own vanishing point; the two spacings must differ |
| Construction lines still show through the finished drawing | Lines were pressed too hard at the block-in stage | Block in with an HB at barely visible pressure, and lift rather than scrub with a kneaded eraser |
A four-week practice plan
- Week 1 — single boxes. Fifteen minutes a day, four boxes per session, all from the same two vanishing points. Change only the depth. The goal is a box that looks solid from across the room.
- Week 2 — stacked boxes. Twenty minutes a day: two boxes sharing one corner, then a box on top of a box. This is the skill behind every building, table and staircase.
- Week 3 — division. Twenty minutes a day: divide one wall into five storeys, then into eight windows using diagonals. Draw nothing else. Boring, and it fixes most window problems permanently.
- Week 4 — one study from life. Two sessions of the street-corner project above, then one quick version of the same corner with the horizon raised, so you see how viewpoint changes the drawing.
Keep the week 1 sheet. Comparing it with the week 4 study is the clearest evidence that the method, not luck, is doing the work.
Frequently asked questions
Where exactly should the two vanishing points go?
On the horizon line, near the left and right edges of the sheet, and symmetric enough that neither face of the box becomes unreadably thin. Moving both points further apart flattens the view and makes the drawing calmer; moving them closer exaggerates the angle. Keep them inside the paper while you learn, so you can always see what your lines are aiming at.
Why do my verticals have to stay vertical?
Because the paper is standing upright relative to the scene, so upright edges in the scene stay parallel to the paper's sides. Only edges going away from you converge. Three-point perspective, where verticals converge too, is used for tall buildings viewed from below or above, and it is a separate exercise.
Can I draw two-point perspective without a ruler?
Yes, once your freehand lines are steady, and many sketchers prefer it for speed. The ruler is not there to make the drawing look technical; it is there so that a long line genuinely reaches its vanishing point while you are learning the system. Put it away for quick on-location sketches after week three.
How do I know if the drawing is correct before I add detail?
Look for one test: every visible corner must join one vertical to two receding lines that go to different vanishing points, and every receding line must hit its own point when extended with a ruler. If both hold, the construction is sound, whatever the subject is. Detail cannot fix a broken construction, but a sound construction will carry even sketchy detail.
Sketch pencil sets for classrooms, studios and private label
H&B Art manufactures graphite sketch pencil sets for wholesale and OEM programmes. If you are equipping a drawing class, an art studio or a retail line, these three formats cover the most common briefs.
Browse the full range in the Sketch Pencil category, or see paper and sketchbooks for a surface that survives repeated erasing.